Installation
RustSFQ is provided as a Rust library crate. To use it, you must first install Rust and its package manager, Cargo.
1. Install Rust
Please install Rust by following the instructions on the official website:
https://www.rust-lang.org/tools/install
Installing Rust will also install Cargo, the tool used to manage Rust projects and packages.
2. Create a New Rust Project
Once Cargo is installed, you can create a new Rust project using the following command:
cargo new my_rustsfq_project
3. Add RustSFQ to Dependencies
To use RustSFQ in your project, add it to your Cargo.toml under the [dependencies] section:
[dependencies]
rust_sfq = "1.0.3"
4. Optional: Using VSCode and rust-analyzer
You can use any text editor to develop with RustSFQ, but we recommend using Visual Studio Code along with the rust-analyzer extension.
Once installed, rust-analyzer provides powerful IDE features such as:
- Real-time type inference
- Inline compilation errors and warnings
- Code navigation and autocompletion
These features significantly improve development productivity and code quality within the editor.
Getting Started with RustSFQ
This section walks you through a simple example that demonstrates the basic syntax and core functionality of the RustSFQ library.
We’ll build a half-adder circuit and export it as a SPICE netlist.
Example: Half Adder in RustSFQ
The following Rust program defines a half-adder circuit and generates a corresponding SPICE-format netlist.
We’ll review each part step-by-step below.
use rust_sfq::*;

fn half_adder() -> Circuit<3, 0, 2, 0> {
    let (mut circuit, [a, b, clk], [], [c_out, s_out], []) =
        Circuit::create(["a", "b", "clk"], [], ["c", "s"], [], "HalfAdder");

    let (a1, a2) = circuit.split(a);
    let (b1, b2) = circuit.split(b);
    let (clk1, clk2) = circuit.split(clk);

    let c = circuit.and_p(a1, b1, clk1);
    let s = circuit.xor_p(a2, b2, clk2);

    circuit.unify(c, c_out);
    circuit.unify(s, s_out);

    return circuit;
}

fn main() {
    let ha = half_adder();
    design![&ha].print(RsfqlibSpice);
}
Project Setup and Import
#![allow(unused)]
fn main() {
use rust_sfq::*;
}
Start by importing all items from the rust_sfq crate. This gives you access to the main types like Circuit, Wire, and backend generators such as RsfqlibSpice.
Creating a New Circuit
#![allow(unused)]
fn main() {
let (mut circuit, [a, b, clk], [], [c_out, s_out], []) =
    Circuit::create(["a", "b", "clk"], [], ["c", "s"], [], "HalfAdder");
}
This call to Circuit::create() initializes a new circuit with:
- Inputs:
a,b,clk - Outputs:
c,s - Name:
"HalfAdder"
The second and fourth arguments (empty arrays) represent CounterInputs and CounterOutputs, which are unused in this example.
The returned values include:
- a mutable
Circuitobject Wireobjects for the inputsCounterWireobjects for outputs
Splitting Wires for Fan-Out
#![allow(unused)]
fn main() {
let (a1, a2) = circuit.split(a);
let (b1, b2) = circuit.split(b);
let (clk1, clk2) = circuit.split(clk);
}
Circuit object has split() function, which takes one Wire object and returns two Wire objects.
By calling this function, a SPLIT gate is added to the circuit.
Labeling Wires
#![allow(unused)]
fn main() {
let c = circuit.and_p(a1, b1, clk1).label("c", &mut circuit);
}
You can manually assign a label to any wire, which will appear in the generated netlist. If you don’t provide a label, a unique name will be automatically assigned.
Creating Gates
#![allow(unused)]
fn main() {
let c = circuit.and_p(a1, b1, clk1);
let s = circuit.xor_p(a2, b2, clk2);
}
Logic gates such as AND and XOR are created by calling methods on the Circuit object.
In this example:
and_p()creates a carry gatexor_p()creates a sum gate
The _p suffix means the gate is pipelined. It is shorthand for calling the ordered form with a % 1, b % 1, and clk % 0.
Connecting to Circuit Outputs
#![allow(unused)]
fn main() {
circuit.unify(c, c_out);
circuit.unify(s, s_out);
}
To complete the circuit, connect each gate’s output to the corresponding circuit output using unify().
Exporting the Circuit
fn half_adder() -> Circuit<3, 0, 2, 0> {
    ...
    return circuit;
}
fn main() {
    let ha = half_adder();
    design![&ha].print(RsfqlibSpice);
}
The half_adder() function returns a fully constructed Circuit object.
This object is parameterized by the number of inputs, counter inputs, outputs, and counter outputs:Circuit<3, 0, 2, 0>.
The design![&ha] macro creates a Design, runs timing checks, and passes the checked circuit to the backend.
print(RsfqlibSpice) prints a SPICE-format netlist based on the RSFQlib.
You can use a different backend (e.g. RsfqlibVerilog or LogicalVerilog) to export in other formats.
Running the Program
You can generate the SPICE netlist by compiling and running the program:
cargo run
This will print the netlist to standard output.
Output: Example SPICE Netlist
Here is the SPICE netlist generated by the example:
.subckt HalfAdder a b clk c s
XSPLIT1 a _SPLIT1_q1 _SPLIT1_q2 THmitll_SPLIT
XSPLIT2 b _SPLIT2_q1 _SPLIT2_q2 THmitll_SPLIT
XSPLIT3 clk _SPLIT3_q1 _SPLIT3_q2 THmitll_SPLIT
XAND4 _SPLIT1_q1 _SPLIT2_q1 _SPLIT3_q1 c THmitll_AND2
XXOR5 _SPLIT1_q2 _SPLIT2_q2 _SPLIT3_q2 s THmitll_XOR
.ends
- Each logic gate is named sequentially (e.g.,
XAND4,XXOR5) - Wires starting with an underscore (e.g.,
_SPLIT1_q1) are automatically generated - Labels like
candsappear as specified by the circuit outputs
Summary
In this example, you learned how to:
- Create a new circuit using
Circuit::create() - Instantiate gates and label outputs
- Connect gate outputs to declared circuit outputs
- Export the circuit as a netlist
Circuit
Overview
The Circuit struct corresponds to a subcircuit in SPICE and serves as the main object for constructing SFQ circuits in RustSFQ.
The Circuit instance holds the gate and wire information needed to build a netlist.
Netlist generation is performed through Design. A Design runs timing checks for its circuits and then invokes the selected backend, such as SPICE or Verilog.
Type Parameter
A Circuit is parameterized by four compile-time constants representing the number of I/O channels:
#![allow(unused)]
fn main() {
Circuit<NUM_INPUT, NUM_COUNTER_INPUT, NUM_OUTPUT, NUM_COUNTER_OUTPUT>
}
Input and output are I/O channels for Wire. These are normal I/O channels.
Counter input and counter output are I/O chennels for CounterWire.
Counter input is logical input for CounterWire, but it is physical output in netlist.
Creating a Circuit Instance
A new Circuit can be instantiated using the Circuit::create() function.
This function defines the structure of the circuit by specifying its I/O ports and name.
#![allow(unused)]
fn main() {
pub fn create(
    inputs: [&str; N_I],
    counter_inputs: [&str; N_CI],
    outputs: [&str; N_O],
    counter_outputs: [&str; N_CO],
    name: &str,
) -> (Circuit<N_I, N_CI, N_O, N_CO>, [Wire; N_I], [CounterWire; N_CI], [CounterWire; N_O], [Wire; N_CO])
}Parameters:
inputs: Array of names for input wirescounter_inputs: Array of names for counter input wiresoutputs: Array of names for output wirescounter_outputs: Array of names for counter output wiresname: A string representing the name of the subcircuit (used in the netlist)
The lengths of these arrays determine the type parameters of the Circuit.
Return Value:
This function returns a tuple of:
- The
Circuitinstance itself - An array of
Wireinstances for the input ports - An array of
CounterWireinstances for the counter input ports - An array of
CounterWireinstances for the output ports - An array of
Wireinstances for the counter output ports
The wires for input ports are used to start constructing the circuit while the wires for output ports are used to finish constructing.
Functions
To construct a circuit, a Circuit instance provides the following functions:
Logic Gates
The and() function adds an AND gate to the circuit.
#![allow(unused)]
fn main() {
pub fn and(&mut self, a: OrderedWire, b: OrderedWire, clk: OrderedWire) -> Wire
pub fn and_p(&mut self, a: Wire, b: Wire, clk: Wire) -> Wire
}
This function takes ownership of the input wires: a, b, and clk.
After being passed into the function, these wire values cannot be used again elsewhere in the program.
The function returns a new Wire that represents the output of the AND gate.
Clocked gates take OrderedWire values. Use the % operator to attach the local order:
#![allow(unused)]
fn main() {
let q = circuit.and(a % 1, b % 1, clk % 0);
}
In normal user code, you do not need to name the OrderedWire type directly; it is produced by the % operator.
Timing constraints are generated from smaller order values to larger order values. Equal order values mean there is no ordering constraint between those inputs.
For the common pipeline case, use the _p variants:
#![allow(unused)]
fn main() {
let q = circuit.and_p(a, b, clk);
}
and_p(a, b, clk) is shorthand for and(a % 1, b % 1, clk % 0). The same pattern is available for or_p, xor_p, not_p, xnor_p, and dff_p.
Use the explicit ordered form when a gate needs a timing relation other than “clock first, data second”.
Other logic and routing gates (OR, XOR, XNOR, NOT, DFF, NDRO, JTL, BUFF, MERGE, and ZERO_ASYNC) are provided as similar functions. While the number of their input wires may differ, all of these functions return a single Wire corresponding to the gate’s output.
SPLIT
The split() function adds an SPLIT gate to the circuit.
#![allow(unused)]
fn main() {
pub fn split(&mut self, a: Wire) -> (Wire, Wire)
}
The function takes one input Wire and returns a tuple of two new Wire instances.
This is necessary whenever the same signal needs to be used as input to multiple gates, ensuring that each use has its own distinct Wire object.
Gates for CounterWire
To support circuits employing counter-flow clocking, BUFF and SPLIT are available for CounterWire.
#![allow(unused)]
fn main() {
pub fn cbuff(&mut self, q: CounterWire) -> CounterWire
pub fn csplit(&mut self, q1: CounterWire) -> (Wire, CounterWire)
pub fn csplit2(&mut self, q1: CounterWire, q2: CounterWire) -> CounterWire
}
The cbuff() function takes a CounterWire representing the output of a BUFF gate then returns a new CounterWire representing the input of the gate.
The csplit() function takes one CounterWire representing the one output of a SPLIT gate then returns a tuple of a new Wire representing the other output of the gate and a new CounterWire representing the input of the gate.
The csplit2() function takes two CounterWires representing the outputs of a SPLIT gate then returns a new CounterWire representing the input of the gate.
Subcircuits
The subcircuit() function allows you to instantiate a reusable subcircuit within a larger circuit.
#![allow(unused)]
fn main() {
pub fn subcircuit<const M_I: usize, const M_CI: usize, const M_O: usize, const M_CO: usize>(
    &mut self,
    circuit: &Circuit<M_I, M_CI, M_O, M_CO>,
    inputs: [Wire; M_I],
    counter_inputs: [CounterWire; M_CI],
) -> ([Wire; M_O], [CounterWire; M_CO])
}
It takes:
- A reference to an existing
Circuit - An array of
Wires for the subcircuit’s inputs - An array of
CounterWires for the subcircuit’s counter inputs
It returns a tuple of:
- An array of
Wires for the subcircuit’s outputs - An array of
CounterWires for the subcircuit’s counter outputs
The input arrays are checked at compile time for correct lengths, ensuring type safety
The subcircuit is passed by reference, so ownership is preserved and the same subcircuit can be reused multiple times in different contexts
Loops
To construct feedback loops, use the gen_loop() function:
#![allow(unused)]
fn main() {
pub fn gen_loop(&mut self, label: &str) -> (Wire, CounterWire)
}
This returns a pair of Wire and CounterWire representing the same wire.
By unifying the CounterWire with another Wire later, you can ensure the Wire has a driver.
Unification
The unify() function connects a Wire and a CounterWire.
Since a Wire has a driver and a CounterWire has a receiver, unifying them creates no new wire. Therefore, the function has no return value.
#![allow(unused)]
fn main() {
pub fn unify(&mut self, wire: Wire, cwire: CounterWire)
}
This is primarily used in two scenarios:
- To connect a wire to an output port of the circuit
- To close a feedback loop created with
gen_loop()
The label of the unified wire is determined as follows:
- If only one side has an explicit label, that label is used
- If both sides have labels and they match, the label is retained
- If both sides have labels and they differ, the function raises an error
Labeling
You can assign an explicit label to a wire using the label() function.
For a Wire, call:
#![allow(unused)]
fn main() {
pub fn label(&mut self, wire: &Wire, label: &str)
}
For a CounterWire, call:
#![allow(unused)]
fn main() {
pub fn clabel(&mut self, cwire: &CounterWire, label: &str)
}
You can also label a wire inline and keep ownership of it:
#![allow(unused)]
fn main() {
let q = circuit.buff(a).label("q", &mut circuit);
}
The function takes a reference to the wire, so ownership is not moved.
Explicit labels must not begin with an underscore to avoid conflicts with automatically generated labels.
A wire that already has an explicit label cannot be labeled again.
RustSFQ does not check for collisions among explicitly assigned labels; it is the user’s responsibility to ensure uniqueness.
Exporting
Use Design to check timing constraints and generate backend-specific output.
design![...] accepts circuits in subcircuit-to-parent order. This is important when a circuit instantiates another circuit, because the timing constraints of the subcircuit are needed before checking the parent.
use rust_sfq::*;

fn half_adder() -> Circuit<3, 0, 2, 0> { ... }
fn full_adder(ha: &Circuit<3, 0, 2, 0>) -> Circuit<4, 0, 2, 0> { ... }

fn main() {
    let half_adder = half_adder();
    let full_adder = full_adder(&half_adder);

    design![&half_adder, &full_adder].print(RsfqlibSpice);
}
If you need the generated string instead of printing it directly, use generate():
#![allow(unused)]
fn main() {
let netlist = design![&half_adder, &full_adder].generate(RsfqlibSpice);
}
Timing Model
Overview
SFQ circuits usually operate as gate-level pipelines. However, by controlling the arrival order of data and clock pulses, the same gates can also be used in a combinational style.
RustSFQ uses an arrival-order-based timing model so that designers can describe the intended behavior of arbitrary SFQ circuits while still keeping this flexibility. RustSFQ also provides a cycle-level simulation environment based on this timing model.
Assumptions
RustSFQ models timing under the following assumptions:
- The whole circuit is driven by a single clock source with a fixed frequency.
- The start time of a cycle may differ from gate to gate. For each gate, a cycle is measured from the earliest pulse that can arrive at that gate.
- A logical value is represented by the presence or absence of a pulse. No pulse means
0; one or more pulses mean1. In particular, two or more pulses are treated the same as one pulse.
Example 1
The source code and simulation code for this example are available under samples/timings.
Consider the following circuit, which consists of an OR gate followed by a NOT gate.
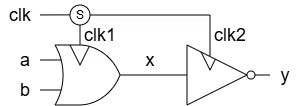
Pipelined Version
Because OR and NOT gates are clock-synchronous gates, they are commonly operated as a two-stage pipeline. In RustSFQ, this can be written as follows:
#![allow(unused)]
fn main() {
fn nor_pipelined() -> Circuit<3, 0, 1, 0> {
    let inputs = ["a", "b", "clk"];
    let outputs = ["y"];
    let (mut ckt, [a, b, clk], [], [y_out], []) =
        Circuit::create(inputs, [], outputs, [], "NorPipelined");

    let (clk1, clk2) = ckt.split(clk);
    ckt.label(&clk1, "clk1");
    // pipelined
    let x = ckt.or(a % 1, b % 1, clk1 % 0).label("x", &mut ckt);

    ckt.label(&clk2, "clk2");
    // pipelined
    let y = ckt.not(x % 1, clk2 % 0);

    ckt.unify(y, y_out);

    return ckt;
}
}
Both the or and not gates specify that the clock pulse arrives before the data input pulses.
The % operator attaches an arrival-order number to each input.
Only the relative order matters; these numbers are not physical delay values.
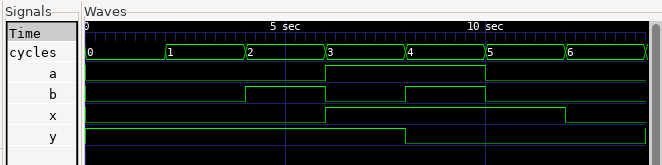
Run the cycle-level logical simulation with:
cd samples/timings/logical
cargo run logical > modules.v
iverilog -g2012 -s top -I ../../../lib/logical/ nor-p-test.sv
./a.out
gtkwave nor-p-test.vcd
The simulation result is shown below.
The intermediate signal x = a | b is delayed by one cycle from a and b, and the output y = ~x is delayed by one more cycle.
Next, run the analog simulation with:
cd samples/timings/spice
cargo run spice > modules.cir
josim-cli -o nor-p-test.csv nor-p-test.cir
python josim-plot2.py nor-p-test.csv -t stacked
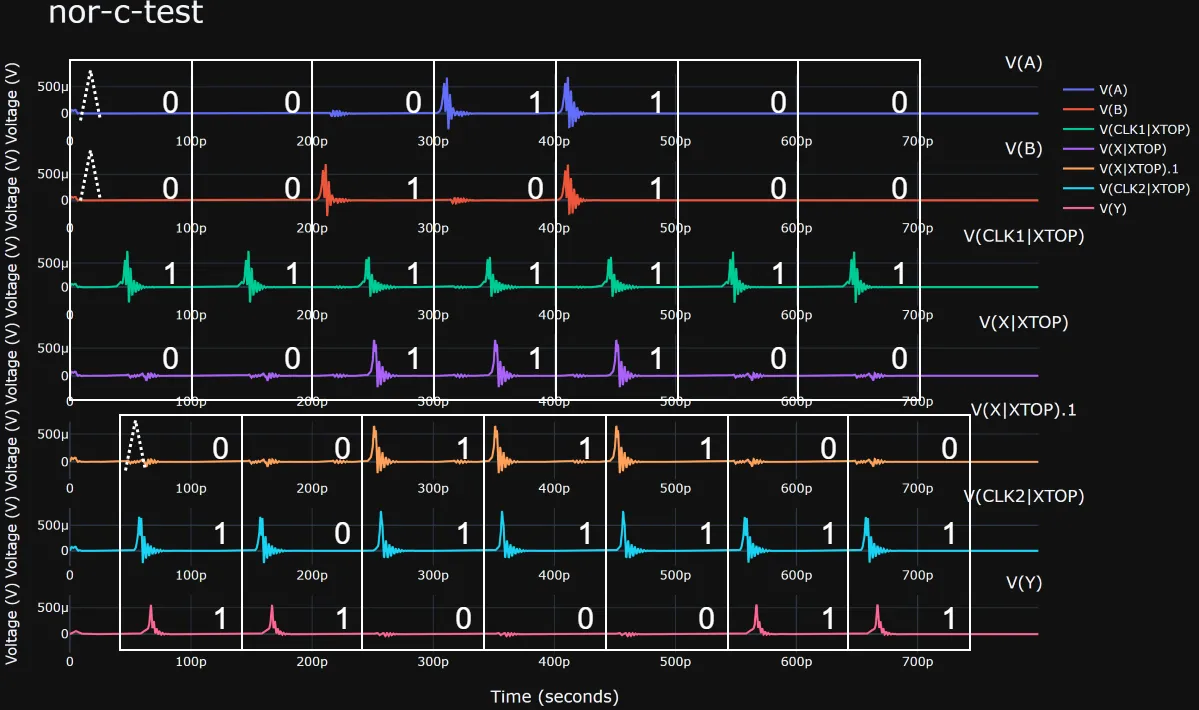
The result is:
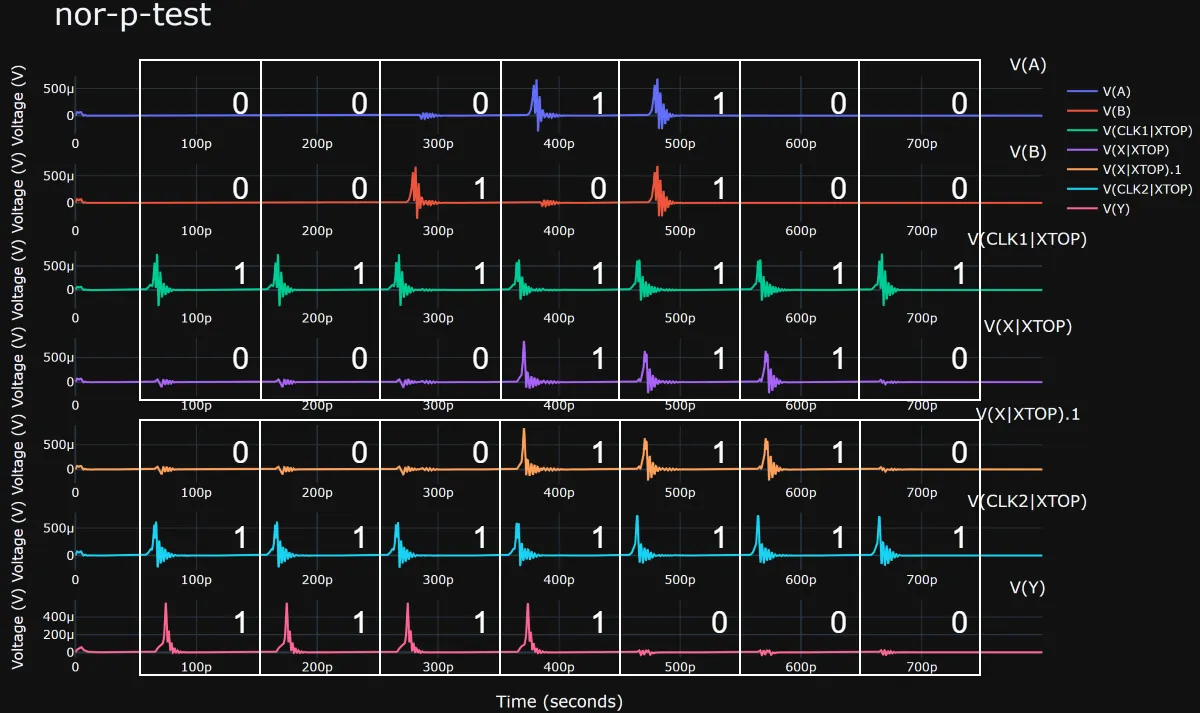
The top four traces show the inputs and output of the OR gate, and the bottom three traces show the input and output of the NOT gate. The white boxes indicate the cycle boundaries for each gate.
The start time of each gate-local cycle is determined by the first pulse that can arrive at that gate.
In this example, both gates use the clock signal as the reference, which matches the description let x = ckt.or(a % 1, b % 1, clk1 % 0).
The 0 and 1 labels in the figure indicate whether a pulse is present in that cycle.
These values match the cycle-level logical simulation above.
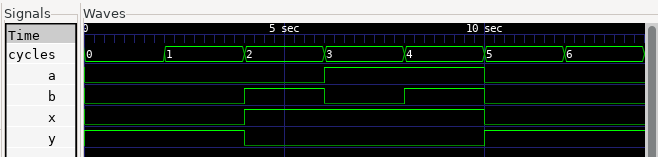
Combinational Version
If the clock arrives after the data within a cycle, the gate behaves like part of a combinational circuit.
This behavior can be described in RustSFQ as follows:
#![allow(unused)]
fn main() {
fn nor_combinational() -> Circuit<3, 0, 1, 0> {
    let inputs = ["a", "b", "clk"];
    let outputs = ["y"];
    let (mut ckt, [a, b, clk], [], [y_out], []) =
        Circuit::create(inputs, [], outputs, [], "NorCombinational");

    let (clk1, clk2) = ckt.split(clk);
    ckt.label(&clk1, "clk1");
    // combinational
    let x = ckt.or(a % 0, b % 0, clk1 % 1).label("x", &mut ckt);

    ckt.label(&clk2, "clk2");
    // combinational
    let y = ckt.not(x % 0, clk2 % 1);

    ckt.unify(y, y_out);

    return ckt;
}
}
The only difference from the pipelined version is the timing specified on the OR and NOT gates. In terms of connectivity, both descriptions still correspond to the same circuit schematic.
The cycle-level logical simulation gives the following result, confirming that the circuit operates combinationally.
Now consider the corresponding analog simulation. Timing specifications in RustSFQ describe the intended behavior of the circuit. They do not, by themselves, guarantee that the physical circuit satisfies those timing constraints.
For that reason, BUFF gates are inserted on the clock path below to adjust the delay.
#![allow(unused)]
fn main() {
fn nor_combinational() -> Circuit<3, 0, 1, 0> {
    let inputs = ["a", "b", "clk"];
    let outputs = ["y"];
    let (mut ckt, [a, b, clk], [], [y_out], []) =
        Circuit::create(inputs, [], outputs, [], "NorCombinational");

    let (clk1, clk2) = ckt.split(clk);
    ckt.label(&clk1, "clk1");
    let x = ckt.or(a % 0, b % 0, clk1 % 1).label("x", &mut ckt);

    // delays for analog simulation
    let clk2 = ckt.buff(clk2);
    let clk2 = ckt.buff(clk2);
    ckt.label(&clk2, "clk2");
    let y = ckt.not(x % 0, clk2 % 1);

    ckt.unify(y, y_out);

    return ckt;
}
}
The analog simulation result is:
Cycle start positions differ by gate and are based on the earliest time at which an input signal can arrive at each gate.
In the first cycle of this example, there are no pulses on A, B, or X, but dashed lines mark where those pulses will appear if they are present.
The 0 and 1 labels in this simulation result match the earlier cycle-level logical simulation.
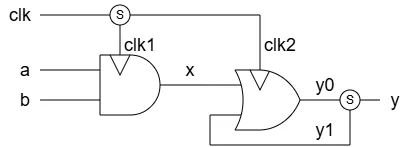
Example 2: Single-Cycle and Multi-Cycle Paths
The examples in this section compare a single-cycle path with a multi-cycle version of the same data path.
Both circuits split the input a into two branches.
One branch is captured by a DFF to produce x; the other branch is used as the second input of an AND gate.
Single-Cycle Path
In the single-cycle version, the second branch, a2, has no explicit cycle delay.
It is consumed by the pipelined AND gate in the usual way.
The _p helpers describe the ordinary pipelined arrival order: the clock arrives before each data input.
#![allow(unused)]
fn main() {
fn single_cycle_path() -> Circuit<2, 0, 1, 0> {
let inputs = ["a", "clk"];
let outputs = ["y"];
let (mut ckt, [a, clk], [], [y_out], []) =
Circuit::create(inputs, [], outputs, [], "SingleCyclePath");
let (a1, a2) = ckt.split(a);
ckt.label(&a1, "a1");
ckt.label(&a2, "a2");
let (clk1, clk2) = ckt.split(clk);
ckt.label(&clk1, "clk1");
let x = ckt.dff_p(a1, clk1);
ckt.label(&x, "x");
ckt.label(&clk2, "clk2");
let y = ckt.and_p(x, a2, clk2);
let y = ckt.jtl(y);
ckt.unify(y, y_out);
ckt
}
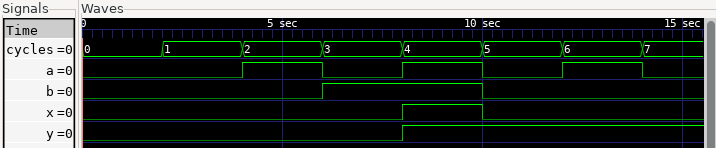
}The cycle-level logical simulation shows the values of a, x, and y for the single-cycle path.
The numbers in the waveform identify the input values associated with each cycle in which the AND output is 1.

The corresponding analog simulation shows the pulse waveforms at the input, DFF output, bypass path, clock branches, and output.

Multi-Cycle Path
The multi-cycle version delays the a2 branch by two additional cycles before it reaches the same AND gate.
For example, this can model a very long interconnect whose signal propagation takes a substantial amount of time.
#![allow(unused)]
fn main() {
fn multi_cycle_path() -> Circuit<2, 0, 1, 0> {
    let inputs = ["a", "clk"];
    let outputs = ["y"];
    let (mut ckt, [a, clk], [], [y_out], []) =
        Circuit::create(inputs, [], outputs, [], "MultiCyclePath");

    let (a1, a2) = ckt.split(a);
    ckt.label(&a1, "a1");

    // Physical delay for analog simulation.
    let mut a2 = a2;
    ckt.label(&a2, "a2_start");
    for _ in 0..32 {
        a2 = ckt.buff(a2);
    }
    ckt.label(&a2, "a2_end");

    // Cycle delay for logical simulation.
    ckt.add_delay(&a2, 2);

    let (clk1, clk2) = ckt.split(clk);
    ckt.label(&clk1, "clk1");
    let x = ckt.dff_p(a1, clk1);
    let x = ckt.buff(x);
    let x = ckt.buff(x);
    ckt.label(&x, "x");

    ckt.label(&clk2, "clk2");
    let y = ckt.and_p(x, a2, clk2);
    let y = ckt.jtl(y);

    ckt.unify(y, y_out);

    ckt
}
}
add_delay(&a2, 2) describes a two-cycle delay in RustSFQ’s timing model.
The cycle-level logical backend represents it with two additional registers.
The BUFF chain is separate from the timing constraint. It supplies an actual physical delay for analog simulation, where the a2_start and a2_end labels make the delayed path easy to inspect.
Timing annotations state the intended cycle-level behavior; physical buffers are still needed to make the analog circuit satisfy that intent.
The logical simulation therefore differs from the single-cycle case.
For each output pulse on y, the corresponding value of a is from three cycles earlier: one cycle of pipelining plus the two additional cycles.

The analog waveform confirms that the BUFF chain delays the a2 path from a2_start to a2_end before it reaches the AND gate.

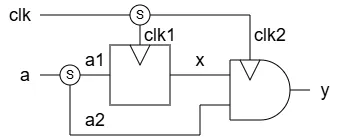
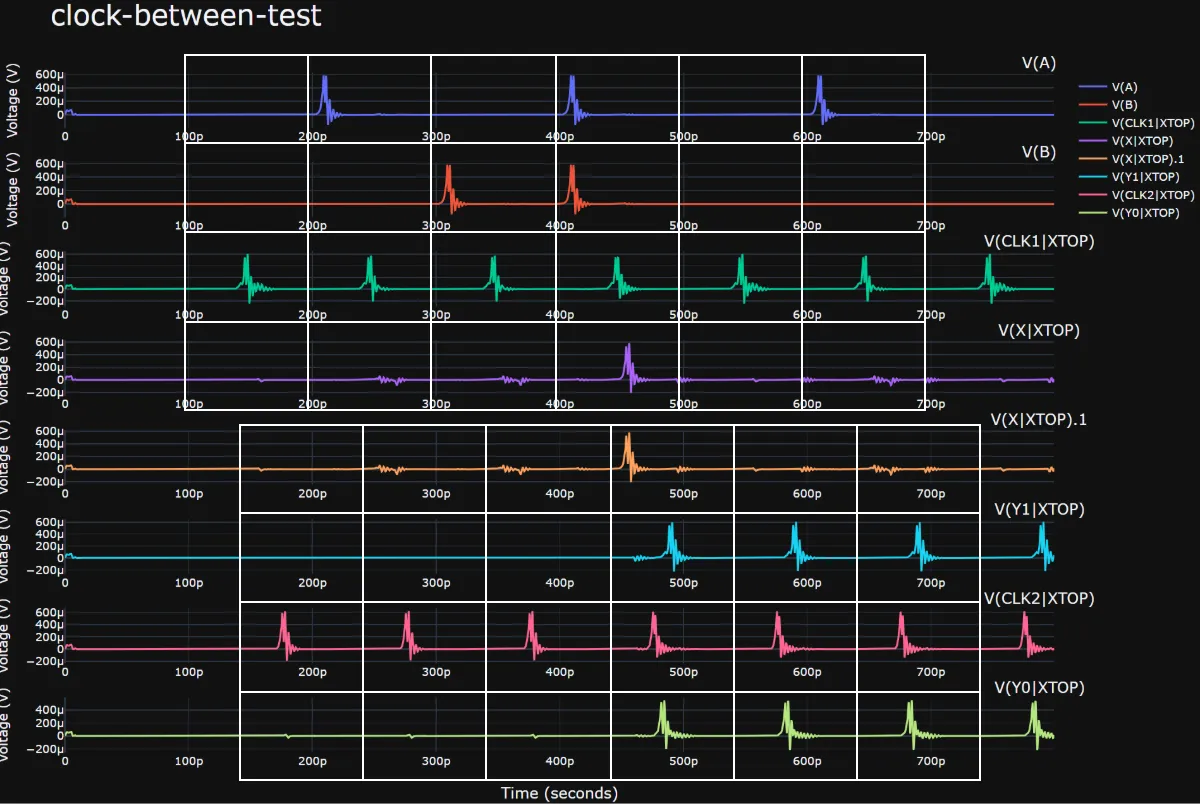
Example 3: Clock Between Data Arrivals
The arrival order at a clocked gate need not be strictly pipelined or strictly combinational.
This example uses an OR gate whose first data input, x, arrives before the clock, while its second data input, y1, arrives after the clock:
x < clk2 < y1
The circuit first computes x = a & b in a combinational style. It then feeds x and the feedback signal y1 into the OR gate, whose output is split into the circuit output y and the feedback path.
#![allow(unused)]
fn main() {
fn clock_between_data() -> Circuit<3, 0, 1, 0> {
    let inputs = ["a", "b", "clk"];
    let outputs = ["y"];
    let (mut ckt, [a, b, clk], [], [y_out], []) =
        Circuit::create(inputs, [], outputs, [], "ClockBetweenData");

    let (clk1, clk2) = ckt.split(clk);
    ckt.label(&clk1, "clk1");

    let x = ckt.and(a % 0, b % 0, clk1 % 1).label("x", &mut ckt);

    // Delay clk2 for analog simulation.
    let mut clk2 = clk2;
    for _ in 0..5 {
        clk2 = ckt.buff(clk2);
    }
    ckt.label(&clk2, "clk2");

    let (y1, y1_out) = ckt.gen_loop("y1");

    // x arrives before the clock, while y1 arrives after it.
    let y0 = ckt.or(x % 0, y1 % 2, clk2 % 1);
    ckt.label(&y0, "y0");

    let (y, y1) = ckt.split(y0);
    ckt.unify(y, y_out);
    ckt.unify(y1, y1_out);

    ckt
}
}
The arrival orders on the OR gate express the relationship directly: x % 0 arrives first, clk2 % 1 arrives next, and y1 % 2 arrives last.
This is neither the usual pipeline order, where the clock is first, nor the combinational order, where the clock is last.
The cycle-level logical simulation shows the resulting feedback behavior.
For the analog simulation, the five BUFF gates on the clk2 path provide the physical clock delay needed to realize this arrival order.
The waveform shows x, the delayed clock, y1, and y0 in their intended sequence.
Example 4: Unsatisfiable Timing Constraints
RustSFQ rejects a circuit when its requested arrival orders within a cycle cannot be satisfied.
The following example resembles the previous feedback circuit, but it requires the feedback signal y1 to arrive before clk2:
#![allow(unused)]
fn main() {
fn unsatisfiable_timing() -> Circuit<3, 0, 1, 0> {
    let inputs = ["a", "b", "clk"];
    let outputs = ["y"];
    let (mut ckt, [a, b, clk], [], [y_out], []) =
        Circuit::create(inputs, [], outputs, [], "UnsatisfiableTiming");

    let (clk1, clk2) = ckt.split(clk);
    ckt.label(&clk1, "clk1");

    let x = ckt.and(a % 0, b % 0, clk1 % 1).label("x", &mut ckt);

    let (y1, y1_out) = ckt.gen_loop("y1");

    // y1 is required before clk2.
    let y0 = ckt.or(x % 0, y1 % 0, clk2 % 1);

    let (y, y1) = ckt.split(y0);
    ckt.unify(y, y_out);
    ckt.unify(y1, y1_out);

    ckt
}
}
y1 % 0 requires y1 to arrive before clk2 % 1. However, y1 is produced from y0, and the OR gate cannot produce y0 until clk2 arrives.
The requested arrival order is therefore contradictory.
Generate this circuit separately from the valid examples:
cd samples/timings
cargo run invalid
RustSFQ stops before backend generation and reports Timing constraints are unsatisfiable.
To make the feedback design valid, add an intentional multi-cycle delay on the feedback path or revise the arrival-order constraints.
Wire and CounterWire
Overview
Wire and CounterWire represent electrical nets in a netlist and are used to describe the connections between gates within a circuit.
A Wire appears when constructing a circuit in a forward direction. It represents a net that has already been driven, but has not yet been received.
A CounterWire is used when constructing circuits in a counter-flow manner, such as in counter-flow clocking. It represents a net that has already been received, but has not yet been driven.
These objects are governed by Rust’s ownership system, which ensures that each wire has exactly one driver and one receiver.
Generating Wires
Although Wire and CounterWire are structs, their constructors are private. Users cannot instantiate them freely.
They can only be obtained in the following ways:
- As circuit’s inputs or outputs when calling
Circuit::create() - As outputs from gate functions such as
and(),xor(), etc. - From loop construction using
gen_loop()
Also, Wire instances cannot be cloned.
Using Wires
Wires are used in the following scenarios:
- Gate inputs: You pass
Wireinstances as arguments to gate functions likecircuit.and(a, b, clk). In doing so, ownership of theWireis moved and cannot be reused. - Labeling: If you want to assign a label to a wire, pass a reference to
label()likecircuit.label(&a). - Unification: When connecting a
Wireand aCounterWire, you pass them tounify()likecircuit.unify(a, b). TheWireandCounterWireis consumed (ownership is moved).
The reason Circuit::create() returns CounterWires for outputs is because those nets are “to be driven.” You use unify() to connect a Wire (already driven) to these CounterWires to complete the connection.
Prevention of Multiple Use
In SFQ circuits, multiple receivers (fanout) from a single wire is prohibited. This restriction is enforced statically via Rust’s ownership system.
When you use a Wire as an input to a gate function, ownership is moved.
You cannot pass the same Wire to another gate function afterward, preventing accidental multi-use.
#![allow(unused)]
fn main() {
let (mut circuit, [a, clk], [], [], []) =
    Circuit::create(["a", "clk"], [], [], [], "invalid");

let c = circuit.dff(a, clk);
let d = circuit.not(a, clk);    // use of moved value. failed to compile
}
Prevention of Unused Wires
Rust’s ownership system guarantees that a Wire is used at most once, but not necessarily at least once.
In most cases, an unused Wire will be caught by the Rust compiler as an unused variable.
However, it is possible to bypass this warning like this:
#![allow(unused)]
fn main() {
let (mut circuit, [a, b, c], [], [], []) =
    Circuit::create(["a", "b", "c"], [], [], [], "invalid");

// underscored variable name
let _a = circuit.jtl(a);

// discard return value
circuit.jtl(b);

// irrelevant use
println!("{:?}", c.type_id());
}
To catch such silent mistakes, RustSFQ performs runtime validation:
- Each
Wireinternally tracks a private counter for receivers. - When a
Wireis dropped (i.e., its destructor is called), RustSFQ checks whether it has exactly one receiver. - If not, a runtime error is reported.
This mechanism ensures correctness even in subtle or intentionally suppressed cases.
Available Gates and Backends
Compatibility table (as of version 1.0.3)
| Gate | LogicalVerilog | RsfqlibSpice | RsfqlibVerilog |
|---|---|---|---|
| JTL | ✅ | ✅ | ✅ |
| SPLIT | ✅ | ✅ | ✅ |
| MERGE | ✅ | ✅ | ✅ |
| AND | ✅ | ✅ | ✅ |
| OR | ✅ | ✅ | ✅ |
| XOR | ✅ | ✅ | ✅ |
| NOT | ✅ | ✅ | ✅ |
| XNOR | ✅ | ✅ | ✅ |
| DFF | ✅ | ✅ | ✅ |
| NDRO | ✅ | ✅ | ✅ |
| BUFF | ✅ | ✅ | ✅ |
| ZERO_ASYNC | ✅ | ✅ | ✅ |
| TERMINATE | ✅ | ✅ | ✅ |
Backends
Backends are selected when generating a Design:
#![allow(unused)]
fn main() {
let netlist = design![&circuit].generate(RsfqlibSpice);
}LogicalVerilog: simple logical Verilog output for simulationRsfqlibSpice: SPICE output using RSFQlib (https://github.com/sunmagnetics/RSFQlib)RsfqlibVerilog: Verilog output using RSFQlib cell names
For Rust Beginners
This page is intended for readers who have never used Rust before.
It explains the minimum Rust knowledge required to use RustSFQ, including basic syntax, data types, ownership, and how to run your first Rust program.
Hello World
Creating a Project
To create a new project using Cargo (Rust’s build system and package manager), use the following command:
cargo new hello_rust
This creates a new folder hello_rust with the basic project structure.
The main Function
In Rust, the execution of any program begins at the main function. This is the entry point of the program.
Here is the simplest possible Rust program:
fn main() {
    println!("Hello, World!");
}
Running a Project
Navigate into the project directory and run it:
cd hello_rust
cargo run
This will compile the code and execute the main function, producing the output:
Hello, World!
The print! Macro
Rust uses macros for certain language features, and printing to the console is done using the print! macro (note the exclamation mark !).
println! macro prints text with a newline.
#![allow(unused)]
fn main() {
print!("Hello");
println!(", World!");
}
output:
Hello, World!
You can also print variables by using {} inside the string:
#![allow(unused)]
fn main() {
let name = "Alice";
println!("Hello, {}!", name); // Hello, Alice!
let x = 1;
let y = 2;
println!("{} + {} = {}", x, y, x + y);  // 1 + 2 = 3
}
Variables and Types in Rust
In Rust, variables are declared using the let keyword. By default, variables are immutable, but you can make them mutable by adding mut.
#![allow(unused)]
fn main() {
let x = 5;
println!("x = {}", x);  // x = 5
// x = 6; // Error: `x` is immutable

let mut y = 10;
y = 20; // Allowed: `y` is mutable
println!("y = {}", y);  // y = 20
}
Shadowing (Re-declaring a Variable)
Rust allows you to re-declare a variable using let again. This is called shadowing and can be used to change the value.
#![allow(unused)]
fn main() {
let z = 100;
let z = z + 1;
println!("z = {}", z);  // z = 101
}
Integers
Rust has both signed and unsigned integer types with an explicit size, such as:
i8,i16,i32,i64,i128: signedu8,u16,u32,u64,u128: unsigned
These types depend on the system architecture (32-bit or 64-bit):
isize= signed integer the size of a pointerusize= unsigned integer the size of a pointer
By default:
#![allow(unused)]
fn main() {
let a = 10;      // inferred as i32
let b = 20u64;   // explicitly u64
let c: i16 = -5; // type annotation
}
Type Annotations
While Rust often infers types automatically, you can specify them explicitly when needed:
#![allow(unused)]
fn main() {
let x: u32 = 123;
let y: f64 = 3.1415;
let flag: bool = true;
}
String Types
Rust has two kinds of strings:
- String slices (
&str): used for fixed string data String: a growable heap-allocated string
#![allow(unused)]
fn main() {
let name: &str = "Alice";
println!("{}", name);   // Alice

let mut greeting = String::from("Hello");
greeting.push_str(", World!");
println!("{}", greeting);   // Hello, World!
}
Converting String to &str
- Using
.as_str() - Using
&for implicit conversion
fn print_str(s: &str) {
    println!("{}", s);
}

fn main() {
    let s = String::from("Hello");

    print_str(s.as_str());  // OK. explicit conversion
    print_str(&s);          // OK. implicit conversion from &String to &str
    print_str(s);           // NG. Cannot implicitly convert from String to &str
}
Functions
In Rust, functions are defined using the fn keyword. All parameters and return types must be explicitly typed.
Unlike Python or JavaScript, Rust does not support default parameter values.
You must explicitly pass all arguments when calling a function.
Basic Syntax
fn add(a: i32, b: i32) -> i32 {
    a + b
}

fn square(x: i32) -> i32 {
    return x * x;
}

fn main() {
    let sum = add(3, 5);
    let sq = square(sum);
}-
fn— starts a function definition -
(a: i32, b: i32)— parameters with required type annotations -
-> i32— return type (also required) -
The final expression (without a semicolon) is returned
- You can also use
return(with a semicolon)
- You can also use
Ownership and References
Rust has a unique ownership system that ensures memory safety without a garbage collector.
Copy vs Move
Some simple types, like integers, implement the Copy trait.
This means assigning them creates a copy, and both variables can be used.
#![allow(unused)]
fn main() {
let a = 5;
let b = a; // a is copied into b

println!("a = {}, b = {}", a, b); // OK. both are usable
}
However, complex types like String do not implement Copy.
Instead, assigning them transfers ownership — this is called a move.
#![allow(unused)]
fn main() {
let s1 = String::from("hello");
let s2 = s1; // ownership moves from s1 to s2

// println!("{}", s1); // Error: s1 was moved
println!("{}", s2);   // OK
}
Once ownership has moved, the original variable (s1) can no longer be used.
References: Borrowing Instead of Moving
To use a value without taking ownership, you can borrow it by using a reference (&).
fn print_message(msg: &String) {
    println!("Message: {}", msg);
}

fn main() {
    let s = String::from("Rust");
    print_message(&s); // pass by reference
    println!("{}", s); // OK. still usable
}&sis a immutable reference tos- Ownership is not transferred
- The original variable remains usable
Mutable References
If you want to modify a value through a reference, use a mutable reference (&mut).
fn change(s: &mut String) {
    s.push_str(", Rust!");
}

fn main() {
    let mut s = String::from("Hi");
    change(&mut s); // pass by mutable reference
    println!("{}", s); // "Hi, Rust!"
}
Reference Safety Rules
- Only one mutable reference (
&mut) is allowed at a time - A mutable reference (
&mut) and immutable reference (&) cannot coexist - Multiple immutable references (
&) are allowed simultaneously
These rules are enforced at compile time, ensuring memory safety without the need for runtime checks.
Array, Vector, and Tuple
Rust provides multiple ways to store collections of values.
Here are the most common types: array, vector, and tuple.
Array [T; N]
- Fixed-size, stack-allocated collection of elements of the same type.
- Size
Nmust be known at compile time. - You cannot resize an array after creation.
- Arrays can also be unpacked (destructured) just like tuples.
#![allow(unused)]
fn main() {
let arr: [i32; 3] = [10, 20, 30];
println!("{}", arr[0]); // 10

let [x, y, z] = arr;
println!("x = {}, y = {}, z = {}", x, y, z); // x = 10, y = 20, z = 30
}
Vector Vec<T>
- Growable, heap-allocated list of elements.
- All elements must be the same type.
- You cannot destructure a vector in the same way as an array.
#![allow(unused)]
fn main() {
let mut vec: Vec<i32> = Vec::new();
vec.push(1);
vec.push(2);
println!("{:?}", vec); // [1, 2]
}
Shortcut initialization with macro:
#![allow(unused)]
fn main() {
let v = vec![1, 2, 3];
}
Tuple (T1, T2, ...)
- Group values of different types together.
- Fixed size and order matters.
#![allow(unused)]
fn main() {
let tup: (i32, bool, &str) = (42, true, "hello");
let (a, b, c) = tup; // destructuring

println!("First: {}", tup.0); // 42
}
Tuples are especially useful for returning multiple values from a function.
Using Modules
Rust uses a modular system to organize code. When working with external crates (libraries) or internal modules, you use the use keyword to bring items into scope.
External Libraries
To use an external library (crate), you must:
-
Add it to your
Cargo.tomldependencies:[dependencies] rust_sfq = "1.0.3" -
Then import items from the crate in your code:
#![allow(unused)]
fn main() {
use rust_sfq::*;
}
Rust will download the crate from crates.io the first time you build the project.
This brings all public items from the crate into scope, including:
CircuitWire,CounterWire- Backend modules like
RsfqlibSpiceorRsfqlibVerilog
If you prefer more explicit imports:
#![allow(unused)]
fn main() {
use rust_sfq::{design, Circuit, RsfqlibSpice};
}